2020-11-03 15:43:00
107
0
0
1、编译安装xdebug扩展
PS.本人基于bt.cn一键安装的lnmp环境,其他环境请按需配置
1.1 安装xdebug扩展
直接使用宝塔面板安装
或者源码编译xdebug
cd ~
#git clone git://github.com/xdebug/xdebug.git
git clone https://hub.fastgit.org/xdebug/xdebu
2020-11-03 00:47:16
63
0
0
# 1、安装命令
wget -O install.sh http://download.bt.cn/install/install-ubuntu_6.0.sh && sudo bash install.sh

> 外网面板地址: http://121.204.36.4:8888/8bc7bbc4
> 内网面板地址: http://172.24.13.97:8888/8bc7bbc4
> username: ei5hbsxw
> password: de3f78fc
# 2、安装lnmp环境

ps.最小安装,后续用docker
# 参考资料:
https://learnku.com/articles/50117
https://www.bt.cn/bbs/thread-19376-1-1.html
https://baiyue.one/archives/1649.html
https://blog.csdn.net/muyibu/article/details/105702155
https://www.mozuu.com/basic-it-knowledge/391.html
https://blog.class4ever.com/2588.html
2020-11-03 00:26:03
18
0
0
# 0.先决条件(不能一开始就换源,否则将踩坑)
sudo apt-get update #执行更新
#sudo apt-get upgrade #有时间等的话,建议执行这一行
sudo apt-get install ca-certificates #安装ca-certificates组件
# 1. 备份
sudo cp -a /etc/apt/sour
2020-11-02 13:59:21
49
0
0
# 1、下载Docker Desktop for Windows
浏览器打开https://www.docker.com/products/docker-desktop
点击Download for Windows (stable),下载Docker安装程序
# 2、确保WSL内的Docker已经卸载,如果没有卸载,可以执行
sudo apt remove docker-ce
2020-11-02 11:58:49
21
0
0
# 0. 安装 WSL 1 与更新到 WSL 2
参考微软官网教程: https://docs.microsoft.com/zh-cn/windows/wsl/install-win10
# 1. 查看已安装的linux发行版本
wsl -l --all -v
# 2. 导出分发版为tar文件到d盘
wsl --export Ubuntu-20.04 d:\WSL2\u
2019-05-23 21:26:54
16
0
0
2019-05-23 20:43:31
16
0
0
deepin-command
本篇文章主要介绍了深度操作系统中常用命令、系统命令、Vi命令等,您可以通过终端来输入命 令来完成相关操作。
基本命令
您可以通过以下命令来查看系统的信息,其他系统相关命令操作可自行搜索查询。
| 查看系统版本 | cat /etc/deepin-version |
| 查看内核版本 | uname -a |
| 查看软件源信息 | cat /etc/apt/sou |
2019-04-27 08:33:16
47
0
0
1、新增VPN拨号连接
步骤不再赘述
2、设置VPN连接属性
【重要】禁止连接后添加路由
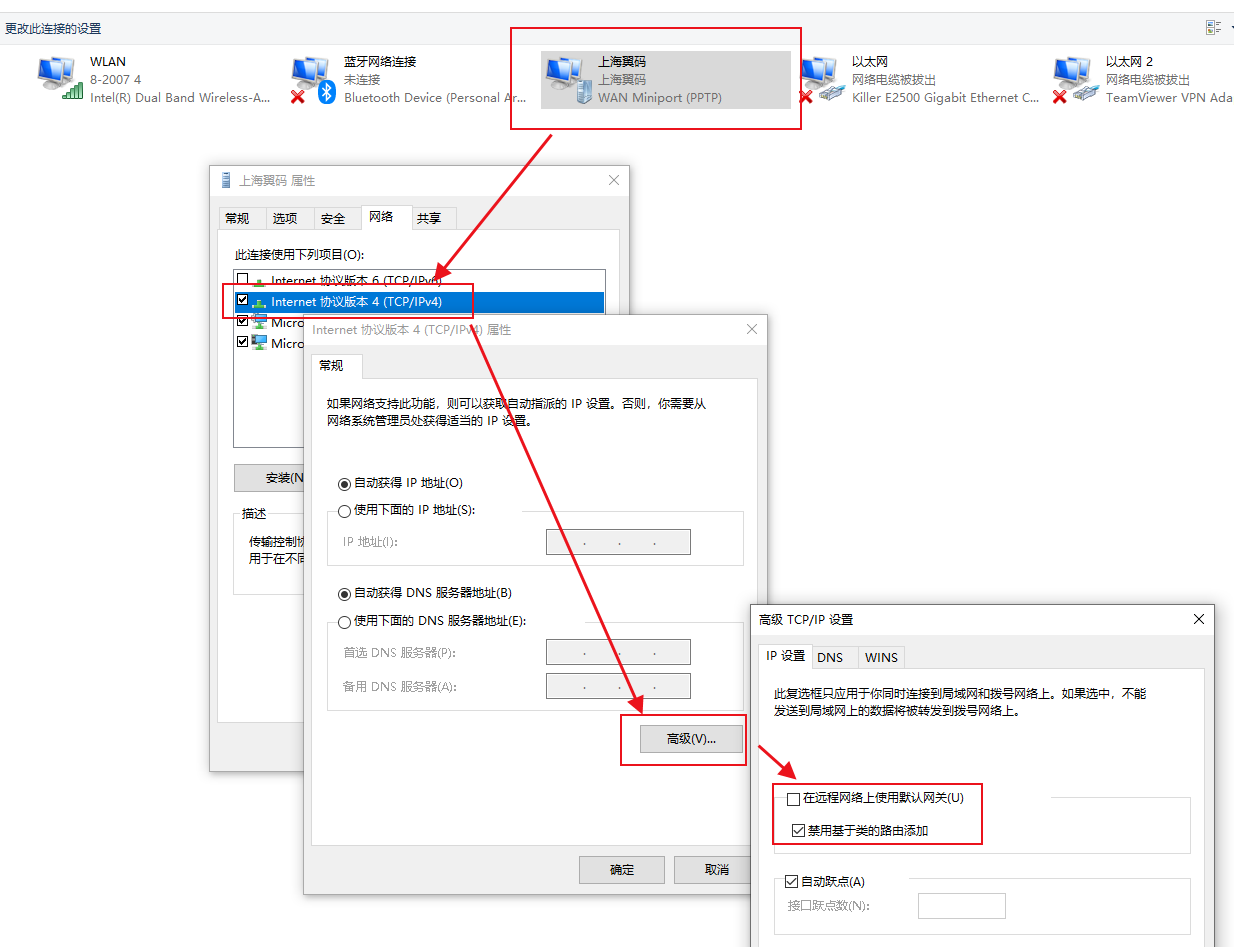
3、创建一键拨号或断开脚本
【注意】
10.10.0.* 是连接VPN后获取到的IP网段
10.10.1.0 是需要走VPN的网段
@echo OFF&PUSHD %~DP0 &TITLE PPTP自动拨号
mode con cols=36 lines=20
color
2019-04-12 13:31:31
33
0
0
换回默认源:
conda config --remove-key channels
1 添加清华源
conda config --add channels https://mirrors.tuna.tsinghua.edu.cn/anaconda/pkgs/free/
conda config --add channels https://mirrors.tuna.tsing
2019-04-12 13:22:39
9
0
0
# 添加一个Python2.7的环境
conda create -n python27 python=2.7

# 查看当前已有的Python环境
conda info --envs

# 切换至python2.7
conda activate python27

# 切换回python
conda deactivate
# 或者 activate base

# 移除python2.7环境
1/2